
Why is my laundry coming out wet? You might have asked yourself after a horrible experience with your washer. Having a washer machine that doesn’t function properly but isn’t could be so frustrating. Lint, pet hair, human hair, and other small objects like hairpins are just a few examples of the detritus that the washing machine filter is made to remove from your clothing. If you don’t clean it frequently, the debris might accumulate and lead to issues.
You probably wanted to do your washing and noticed the machine is vibrating and making loud noises, or it might take longer to complete a cycle. The filter in the washing machine pump may be the root of your problems. Don’t worry. This article will guide you on having a clean washer filter that will enable your machine to function properly.
Is a Washer Filter Needed?
The filter is designed to protect the interior of the pump from debris such as lint, odd stockings, and other types of debris that come up in your washing machine. The filter will capture these things so the pump won’t be harmed.
Occasionally, the undesired object may end up blocking the pump, preventing it from spinning. If this occurs, you could notice that your clothing doesn’t dry completely or that the cycle makes unsettling noises. The drain pump filter and hose ensure the correct and prolonged operation of the washing
Some washing machines may even display an error message to alert you to a pump problem. However, not all contemporary washing machines feature a filter. Some contemporary machines have self-cleaning pumps. Thus, access to the pump is unnecessary.
What location is the washer’s filter?
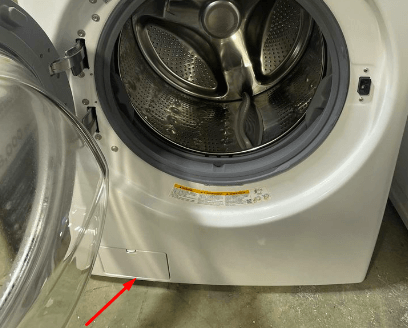
Before locating where your filter exists, it is important to turn off the machine. Start with hitting the power button to turn off the washer, and then remove the plug from the wall socket. To avoid damage, do not place the socket in a wet environment. Also, to avoid the environment from becoming messed up, placing a towel to absorb water from the washer is advisable.
The filter can be located at the front bottom of a standard front-loading machine. Either it will be visible or concealed by the kick strips. To access the filter, you must remove the kick strip, but you should be cautious because they are sometimes quite delicate. Depending on how old the appliance is, the location of the filter on a top-loading washer may vary.
Still having issues locating it? The exact location of the filter on a top-loading washing machine will vary depending on how old the appliance is. Some recent models, which are made to self-clean, might not have a filter that is easily accessible. There should still be a drain hose at the back of the washer if you need to drain it because of problems.
The filter is frequently located at the front bottom of antique top-loading washers. However, some more recent top loaders contain self-cleaning filters; you can locate them below the agitator.
The part of the machine that rotates back and forth during the wash cycle is called the agitator, which is positioned squarely in the center. Even self-cleaning filters require cleaning every 3 – 4 months. A rectangular or circular cover will be over the filter if it is at the machine’s bottom right corner. Consult the owner’s manual if you can’t find your filter.
How to Clean Your Washing Machine Filter
The following maintenance procedures must be carried out to guarantee your washing machine operates at peak efficiency.
- Remove the cover if your filter
- Take out the filter
- Clean the filter
- The screen from the filter should be removed, soaked, and washed
- Inspection of the inner part of the machine
- Replace the filter
- Test for leak
Step 1: Remove the cover
The majority of covers may be removed by drawing them away from the device. Some washers, however, come with childproof coverings that can be more difficult to remove. Use a thin tool, such as a screwdriver, to peel the cover off of these coverings. When you can grab it, turn the cap counterclockwise until you can fully remove it.
Remove the agitator first if your filter is tucked beneath it. Remove the agitator’s cap, then insert your palm into the shaft until a wing-nut screw is felt. Lift the agitator out of the machine by turning the screw counterclockwise until it is out of the way. Lift the filter cover out of the way after removing the agitator.
Step 2: Take out the filter
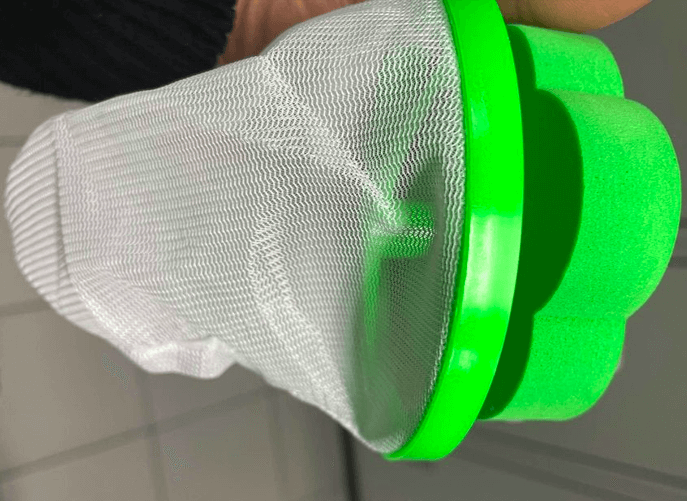
After you might have removed the cap from the filter, it will be easy to pull out the filter.
What if it gets stuck? It’s not a problem at all. You just need to manipulate the filter, moving it around until you can remove it freely. Getting stuck may result from lint or detergent that may have been stocked around it. You’ll notice coverings of wet lint and detergent.
Step 3: Clean the filter
Use a small cleaning brush or an old toothbrush to get rid of lint, hair, soap scum, etc.. A brief rinse should remove the remaining debris, and a paper towel is also useful for wiping up damp debris. Don’t panic if you’re having problems getting rid of the dirt that has become lodged in the filter’s mesh; the next procedure will work to loosen and remove the particles.
Step 4: Washing the Filter
Soaking the filter’s screen in hot water is the simplest approach to cleaning a washing machine filter and clearing mesh blockages. Normally, the filter’s screen can be removed by pulling on the casing; however, if it is not, you can still rinse the filter by holding it with tongs to avoid burning your fingers. Put a detachable screen in a bowl of boiling water and let it sit there for ten minutes. If the filter emits an unpleasant odor, manually wash the filter casing in soap and water while adding a small amount of mild hand soap to the water to make a soapy cleanser.
Step 5: Inspect Washer
Check the inner surface of the machine for any loose lint before replacing the filter. If there is lint in the washer’s drum, wipe it out with a paper towel or scour it with a wet sponge. If the filter was in the machine’s bottom right corner, check the drainage hose and clean it of any lint. You’ll find the hose either in front of or right next to where you removed the filter.
Step 6: Replace the Filter
Once everything is clean, including the drainage hose, filter casing, filter screen, and canal, it’s time to complete by reinstalling each part. Put the drainage hose back in place, cover it with the cap, replace the screen in the filter, and tighten the filter’s screws within the canal.
Step 7: Test for leaks
Run it through a brief cycle to ensure that you have correctly reinstalled the filter and cover before continuing with your usual washes. During the cycle, keep your washer empty. The filter is not installed properly if your washer is dripping.
If you had to remove the drainage hose, ensure it is securely fastened because it is another possible leak source.